Showing posts with label nail art. Show all posts

Guest Post PiinkCupcakez: Watermelon Frenzy


·      NK Base Coat
·      Essie "Splash of Grenadine"
·      Sinful Colors "Rise and Shine"
·      L.A. Colors Art Deco "White"
·      Seche Vite Dry Fast Top Coat
·      rhinestones
·      dotting tool
·      tape
1. Paint thumb and middle fingers with Sinful Colors "Rise and Shine". Paint the rest with Essie "Splash of Grenadine".

2. Once nails are completely dry, tape your Index, Middle, and Pinky fingers as seen below.
*Tip* - Stick the tape onto your hand before sticking it to your nail. If the tape is too sticky it can pull off the nail polish underneath it.


3. Paint them with Sinful Colors "Rise and Shine" and carefully remove the tape while it's still wet.

4. Next, take your white nail art polish and create thin lines that follow the designs you've just created on your middle and pinky nails. You can then stick a rhinestone onto your middle finger using clear nail polish.


5. Get your dotting tool and dot it up!
Don't have a dotting tool? No worries.
I actually used the end of a bobbypin for this.


6. Apply a topcoat and you're done!

Of course you can substitute these nail polishes with your colors of choice.
Happy Painting!


Guest post by PiinkCupcakez

Two-Toned Nails with Glitter

I love doing my nails. If I had the time I would redo them everyday!

Nail art has become so popular lately. The idea of doing nail art on yourself overwhelms a lot of people. 
You don't need to be an artist to turn heads with your nails.

Did you know that you could use items from your local dollar store to assist you with your nail art? Like circular reinforcements that you used in elementary school for lined paper! Use them as a guideline for half moon manicures. Those triangular white makeup sponges that come in packs of 100. Cut them up and use them to create an ombre nail look with your favourite polishes. 


Whenever my manicures start to expire I just get out my glitter. 

Avon MegaWatt Nail Enamel in “Shock” and “Pop” and 
Hard Candy Nail Lacquer in “Hip Hip Hooray.”
Crystal Confetti is a collection of trend-setting nail polish shades that puts the final touch on fingertips and toes with a top-quality formula.


Hardcandy has some of the best glitters!


AVON Nail Art Design Strips Review


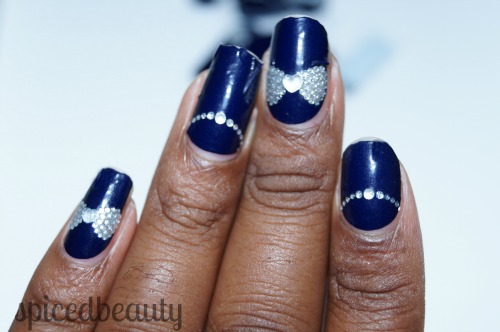
Nail Art is really popular right now. Sometimes you don't have to ability or patience to get the look that you want. My answer is always nail stickers when I am in a bind. In July, Avon will come out with a unique bunch of nail stickers called AVON Nail Art ($10.00). Probably the most intricate designs that I've seen in a while.

• Create salon-style nail art at home with no dry time!
• Dress up your nails with the hottest new appliqués.
• Easy on, easy off nail fashion.
• Won’t smudge or rub off.
• 18 nail strips.


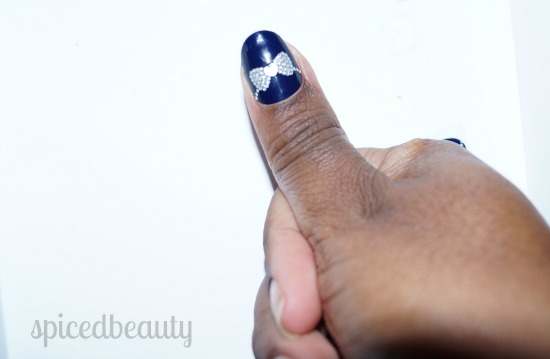
I fell in love with a nail sticker called the Bows For You. It's a deep navy blue with little diamonds which form a bow. Out of all the appliqués I've done, this one gave me the most compliments because of the details. I would be in meeting and I'd have to stop and explain my nails because people were staring!

Let's get started on the application:
All the stickers are on a clear background and you have to put your nail underneath the measure which sticker would work for you. I prefer my nail stickers to be individually wrapped because I feel like its easier to measure which size fits my nail. I usually cut around the sticker strips off in to little blocks so I can determine which size works best.

On to the removal:
When I removed the stickers for the first time it was very tricky! They pretty much rolled up on me and I didn't know what to do. Patience is definitely a virtue with these because if you go fast you'll end up messing up a full hand. When filing your nails, I would recommend using a file that is pretty dull. If the file is fresh, it's rough on the tips. Please see below- First hand the sizing was off.
Duration:
They lasted a long time. The only thing that I had was some wear on the tip which I expected.

The Removal:
Really easy! All I did was peel them off and soak my nails. I looked underneath and it did not take any of my nail enamel with it which that is a really good thing.


Overall:
I wish that I had gotten the hang of these earlier. Next time I'm definitely going to go slower, use a dull nail file and measure up each nail ahead of time so I do not mix of any sizes.

Do you like this design?


Must Have: Kiss Everlasting Gel Polish System


Ladies, if you're looking for a affordable gel system check out the Kiss Everlasting Gel!
  • High-gloss shine, chip-free colour in 3 simple steps: protect, colour, seal & shine
  • Dries instantly, no nicks, dents or scratches
  • Lasts up to 14 days
  • Won't damage, natural nails, soaks off in minutes 


This is the perfect alternative for ladies who are trying to save money this year. Think about it getting gel nails at the salon costs $40+ and that's not including tax & tip.  For the cost of one trip you can get the Kiss® Everlasting Gel Polish Colour Gel Starter System ($29.97) + LED Gel Lamp ($34.47)!

If that doesn't sway you.. did you know that you can layer the gels to make simple nail art!!
Don't quote me on it but look at the cute "design" I did below.


I got several compliments on it and I really surprised people when I said it I did it on my own with a gel polish. I can't wait to try out more designs!  For reference I used the gels Lush & Ballet. Perfect combo!

Are you a fan of gel polishes?


My Essie Good as Gold manicure

Have you had the time to check out Essie's mirror metallic collection?
Good as Gold

I have! 
I took a break from the neons and went right to the metallics. 

I love the way Good as Gold refreshed my old gel manicure. 
I got this professional done.... I'm not that awesome..lol
I went for the half moon/accent nail combo!

Are you feeling my Metallic nails?